
Want to grow your own vegetables but feeling overwhelmed by the idea of building a raised garden bed? Not sure where to put it, what to fill it with, or how to keep weeds and critters out? You’re not alone—and the good news is, it’s easier than you think.
In this step-by-step guide, I’ll show you exactly how to build a raised garden bed in just one afternoon—even if you’ve never picked up a drill. From choosing the perfect spot to filling it with the right soil mix, you’ll learn everything you need to create a productive, low-maintenance garden bed that’s ready for planting.
Planting 101 participates in affiliate programs including Amazon Associates Program and may earn commission from qualifying purchases at no extra cost to you. Thank you for your support.
Why Raised Garden Bed
Before we go into the step-by-step guide, let’s talk about why raised garden beds are such a great choice—whether you’re just starting out or have years of gardening experience.
They offer excellent soil control, improve drainage, and make it easier to manage weeds and pests. Best of all, you can build one in just an afternoon!
Here’s a simple, step-by-step guide to help you set up your very own raised garden bed:
Step 1: Know What You’re Growing
Before anything else, decide what vegetables you want to grow. This will help you plan for space, sunlight, and soil needs.
Some plants—like tomatoes and squash—need more room and sun, while others—like lettuce or herbs—can thrive in smaller spaces with partial sun.

Step 2: Sunny Location
When choosing a location for your raised garden bed, the most important factor is sunlight. Pick a spot that gets plenty of sun—most vegetables need at least 6 to 8 hours of direct sunlight each day to thrive.
Be sure to observe the area throughout the day to check for any shade cast by trees, fences, or your house that could limit sun exposure.
Step 3: Flat Level Ground
Choosing level ground is just as important as sunlight. A raised bed placed on a slope can lead to uneven water distribution—where one side dries out too quickly while the other becomes overly saturated.

This not only stresses your plants but also makes it harder to manage consistent soil moisture. A sloped bed can also shift or warp over time, especially after heavy rains.
Flat ground ensures your frame sits securely and allows plant roots to grow evenly and deeply in well-drained, stable soil.
If your yard isn’t perfectly level, you can make some adjustments. Remove a bit of soil from the higher side or add soil to the lower side until the area is even.
Use a long board and a level to check your progress and ensure the frame will sit flush with the ground.
Step 4: Avoid Competition
Make sure to place your raised garden bed far from large trees or shrubs, which can send roots into your raised bed and steal moisture and nutrients from your veggies. The further away from invasive roots, the better your plants will grow.
Step 5: Decide on Size and Shape
A common size for raised beds is 4 feet wide by 8 feet long, with a height of 10 to 12 inches. This size is manageable and allows you to reach the center from either side without stepping into the bed.
If space is limited, don’t worry! You can customize the dimensions to fit your yard.
Step 6: Gather Your Materials
For a hassle-free setup, I suggest buying a raised garden bed kit. These kits usually come with pre-cut, treated wood or other durable materials, along with all the necessary hardware for easy assembly.
Trust me, that’s what I did, and I was able to build my raised garden bed in just one afternoon (and I’m definitely not handy!). Here’s the raised garden bed kit I used.
If you choose to build your bed from scratch, you’ll need untreated wood, such as cedar or redwood, which are naturally rot-resistant. You’ll also need screws or galvanized brackets, a drill or screwdriver, and a level to ensure everything is properly aligned.
To prevent weeds from growing through, you will need a weed barrier fabric or cardboard for the bottom of the bed.
If you have a lot of garden critters, I suggest getting a galvanized wire mesh to keep critters from digging into your soil. This is the wire mesh I used for my raised garden bed.
You will also need topsoil, compost, and potting mix. Use my raised garden bed soil calculator to figure out how much soil to buy.
You will also need landscape staples to secure the weed barrier, and you will need mulch or gravel to create pathways around the bed.
Step 7: Prepare the Ground
You need to prepare and clear the area where your raised bed will go. Remove grass, weeds, and debris, and level the surface as much as possible so the frame sits flat.
This is the hardest part of the entire process! I had to ask my husband to help me!
Step 8: Build the Frame
Follow the instructions of your raised garden bed kit to build the frame. If you are handy, you can certainly build your own frame.

Start by cutting your boards to the desired length if needed. Once everything is ready, begin assembling the frame by connecting the boards at the corners using screws or galvanized brackets.
Make sure the frame is square by checking the angles with a square tool or using a simple measuring technique to confirm that the sides are equal.
As you assemble, use a level to ensure the frame sits evenly on the ground, which will help prevent it from shifting or becoming uneven over time.
Step 8: Lay Down Weed Barrier
Place a layer of weed barrier fabric or plain cardboard across the entire base of the bed. This helps suppress weeds from growing up into your soil.
If using fabric, secure it with landscape staples to keep it in place.

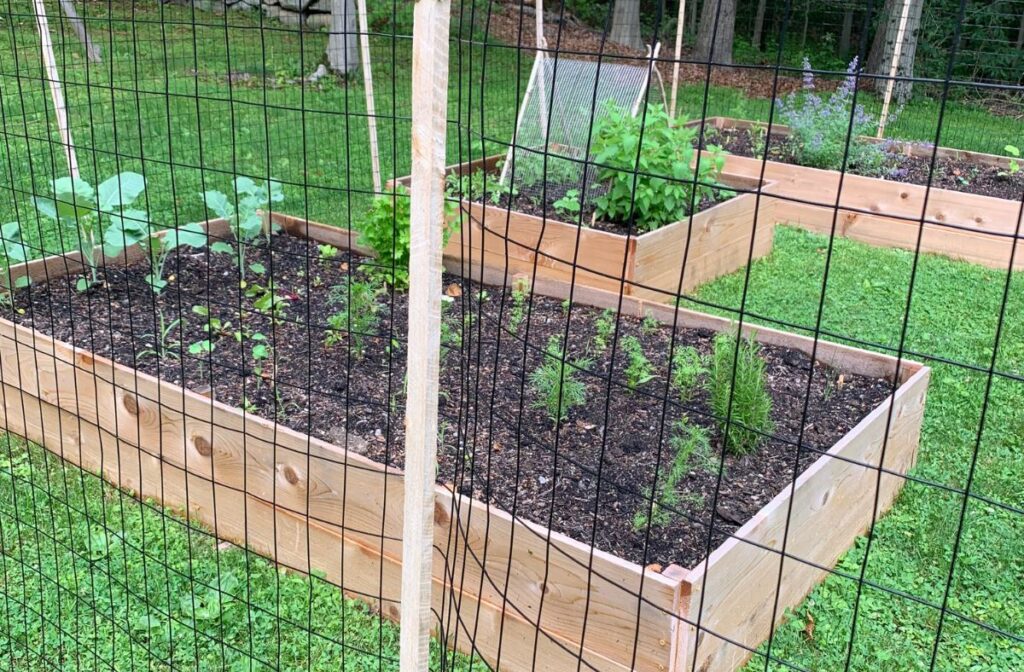
Step 9: Install Wire Mesh to Deter Critters
Before putting down the raised bed, lay galvanized wire mesh over the weed barrier and attach it to the bottom edges of the frame using a staple gun or nails.
This prevents burrowing pests like moles, voles, and gophers from digging into your garden from below.

Step 10: Fill the Bed with Soil
Now that your frame is ready, it’s time to fill the bed with soil. Start by choosing a high-quality soil mix, I suggest 60% topsoil, 30% compost, and 10% potting mix.
This combination ensures your plants have the nutrients they need while also providing good drainage. To make sure you get the right amount of soil, use my soil calculator to easily do the math.
You will need the dimensions of your raised bed, which will help you figure out how much topsoil, compost, and potting mix you need.
Once you have your soil, begin adding it to the bed, mixing the components together as you go. Fill the bed up to about 1 inch below the top.
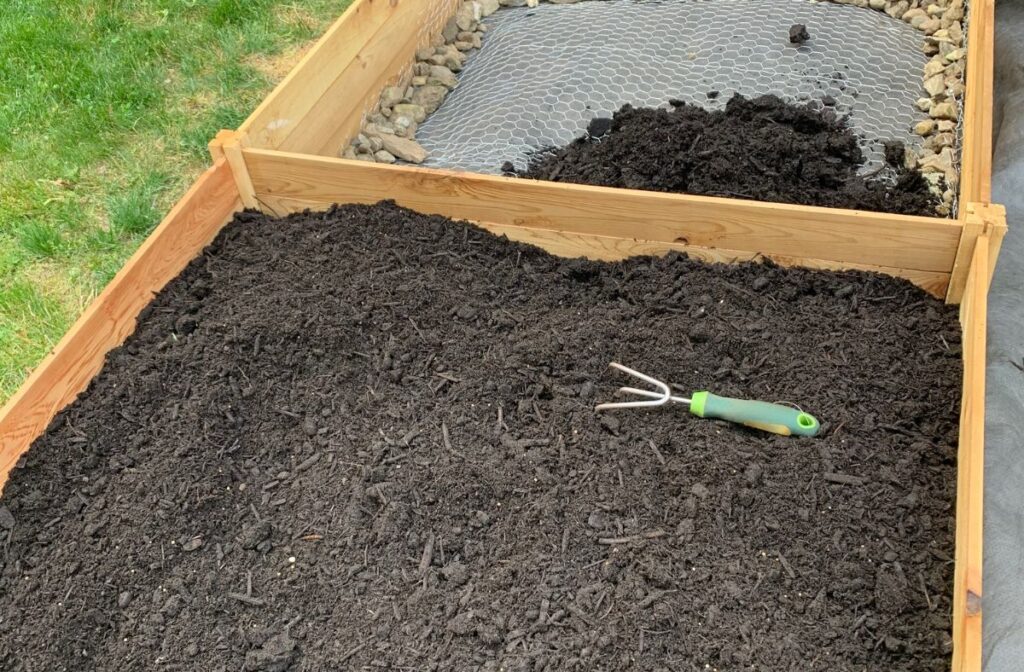
After filling, lightly tamp the soil to settle it and prevent air pockets, and you’ll be all set for planting!
Step 11: Plan and Plant Your Vegetables
Now that your raised bed is built and filled, it’s time to plan your layout and start planting. Think about how much space each vegetable needs and group plants accordingly.
Some crops, like tomatoes and squash, need plenty of room to spread out, while others—like lettuce, radishes, and most herbs—can thrive in tighter spaces.

If you’re just getting started, I recommend choosing vegetables that are easy to grow, quick to mature, and low maintenance. That way, you’re more likely to stay encouraged and enjoy the process.
Check out my article on easy-to-grow vegetables for beginners if you need some ideas!
Once you’ve planted everything, give your garden a deep, thorough watering to help the roots settle in. Don’t forget to label your plants—it’s easy to forget what’s where once everything starts growing!
And if you’re new to gardening, I suggest starting with seedlings instead of seeds. That’s what I did, and it made the whole experience much simpler and more rewarding.

Step 12: Maintain Your Vegetable Garden
That’s it! Good luck with your vegetable garden. The key to long-term success is consistent care—especially when it comes to watering. Be sure to water regularly but avoid overwatering. A simple way to check is to feel the soil: if the top inch feels dry, it’s time to water.
Add compost every season to replenish nutrients. I also suggest rotating crops every year to prevent soil exhaustion.