

Hostas are hands-down one of my favorite plants in the garden, mostly because of their gorgeous leaves. You’ll see them in every shade of green, plus all those striking variegated patterns with creamy whites, chartreuse, and even deep blues mixed in. They brighten up shady corners and make the whole garden feel lush.
But as much as I love them, hostas don’t stay small for long — they can grow into massive clumps over time. Dividing them not only keeps them from taking over, but it’s also one of the easiest ways to multiply your plants for free. I’ve filled in so many bare spots in my yard just by splitting hostas. Below, we’ll go through exactly how to do it.

Best Time to Divide Hostas
The best times to divide hostas are in the spring or in the fall. In the spring, the plants are just waking up, and you can see the little shoots poking through the soil. That makes it easy to separate them before the leaves get too big.
Fall is also a great choice. The weather is cooler, the plants are starting to slow down for the season, and dividing them now gives the roots plenty of time to settle in before winter. Cooler fall temperatures also mean less stress on the plants and less work for you when it comes to watering.
Fall and spring also brings more rain to soften the soil and reduce transplant shock, these are the best times to divide hostas.
Tips to Make It Easier
There are a few things you can do to make the process go more smoothly. The biggest one is making sure the soil is moist. Trying to dig hostas out of dry, hard ground can feel like you’re chipping away at concrete, and it’s a lot tougher on both you and the plant.
Wet soil, on the other hand, is looser and gives way more easily, so the roots slide out instead of snapping off.
If it hasn’t rained recently, give your hostas a really good watering the day before you plan to divide them. Or, if you’re lucky enough to get a nice soaking rain, that’s one of the very best times to get out there and start digging.
Having the right tools also makes a big difference. A sturdy spade with a sharp edge will cut through the root ball much more easily than a dull one.

For smaller hostas, a garden knife works well, and for really large clumps, some gardeners like to use two digging forks to pry the plant apart from opposite sides. Whatever you use, the key is to make clean cuts rather than tearing through the roots, because that helps the divisions establish themselves more quickly.
Now, let’s go over step by step how to divide hostas.
How to Divide Hostas
Step 1: Dig Up the Hostas
Start by loosening the soil all the way around the plant using a sharp shovel or garden fork. Push the shovel down deep to get under the root ball, then work your way around in a circle.
Hostas have dense roots, so even in soft soil this part can be a workout. Don’t yank upward—use the shovel like a lever. Rock it back and forth to loosen all sides first, then pry the clump out.
If you’re dealing with a really big hosta, lift it in sections instead of trying to haul the whole thing at once.

And don’t worry if it feels like you’re being aggressive—you kinda are. It’s messy and you’ll definitely be slicing through roots, but hostas are tough. They’ll bounce back just fine.
Once you’ve removed it and made your divisions, don’t forget to fill in the empty hole with soil and make sure to water it. It might look a little weird at first—like you’ve got a half hosta sitting there—but it’ll fill back out in no time.
Step 2: Divide Hostas
Once you’ve got the hosta out of the ground, it’s time to separate it into smaller plants. I like to start by spraying the roots gently with a hose to help loosen the soil and untangle it.

Then I soak the roots in a bucket of water for a few minutes — this makes them easier to work with and less likely to break.
Leaving your hostas in a bucket will also give you a chance to give yourself a break. If you’re feeling tired from all that digging, you can safely leave your hosta soaking in the bucket and come back to it a few hours later or even the next day. The roots will stay healthy in the water. Just make sure to keep the bucket in a protected and shaded area.
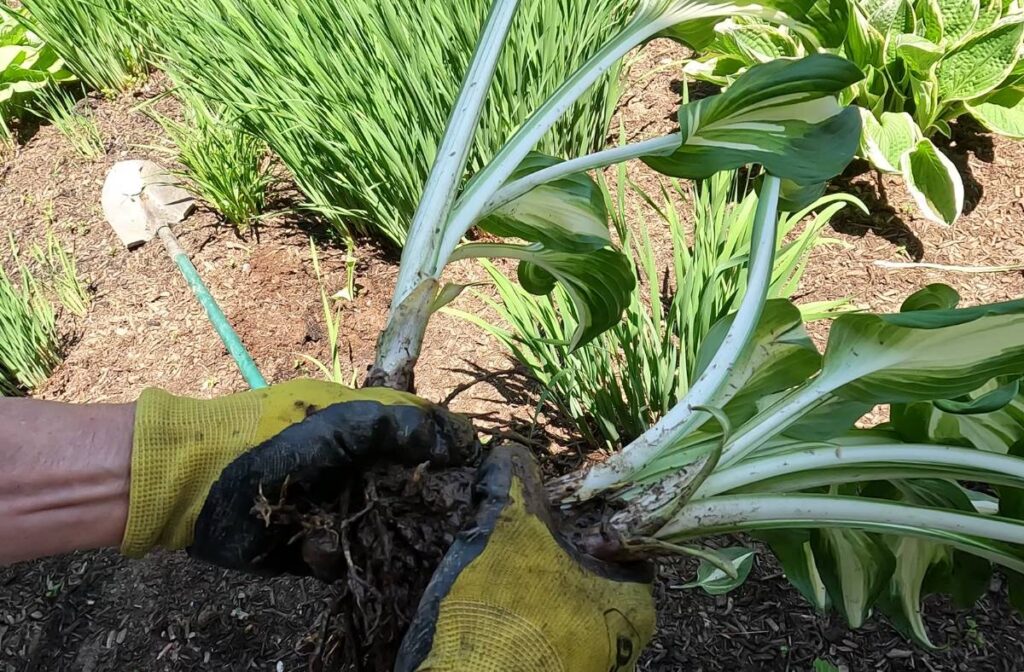
Once you’re ready to divide your hosta, use your hands, a garden knife, or scissors to separate the clump into smaller divisions. Don’t be afraid to cut through roots — hostas are very forgiving.
The key is to make sure each division has a healthy portion of roots and at least a few shoots. If you plant a piece without roots, it won’t survive.
Step 3: Trim the Leaves
Before we plant these divisions, we need to trim the leaves.

What I like to do is cut off all the leaves except one, and then trim that last leaf down to about half its length. The reason we do this is because, when you divide a hosta, the roots get disturbed, and the plant just can’t support a full set of leaves right away.
By trimming them back, we’re telling the plant, “Hey, focus on growing new roots first, not keeping all that foliage alive.”
I know it might look a little drastic to trim all that leaves, but trust me—it makes a big difference.
Step 4: Dig a New Hole
Choose a spot in your garden for the new hosta division. Hostas are shade-loving plants, but most varieties can tolerate morning sun or dappled light. Avoid planting them in hot, dry areas with full afternoon sun.
Dig a hole that’s wide and deep enough to spread out the roots comfortably. A good rule of thumb is to make the hole about twice as wide as the root ball. Loosen the soil at the bottom of the hole so the roots can grow down easily.
Step 5: Fertilize
Before placing your hosta into the hole, sprinkle in a little all-purpose garden fertilizer. This gives the plant a gentle nutrient boost as it settles in. Don’t go overboard — a little goes a long way.
Step 6: Plant the Hosta
Now place your hosta division into the hole. Set it at the same depth it was growing before — you don’t want to bury it too deep. Spread the roots out gently, then backfill the hole with soil, pressing lightly as you go to eliminate air pockets.
When you’re done, the crown of the plant (where the leaves meet the roots) should sit just at or slightly above the soil surface.
Step 7: Water
Finally, water your newly planted hosta. This helps settle the soil around the roots and reduces transplant shock. Keep the soil evenly moist for the next few weeks while the plant establishes itself.
If you’re dividing in the fall or spring, the cooler weather and regular rain will make this step easier. If you’re dividing in the summer, you’ll need to be more vigilant in watering your hosta.